


Family Browser - User documentation
The Family Browser is an efficient add-on to integrate your Revit family libraries into the Autodesk Revit interface. This add-on is designed to save you the hassle of searching and loading families.
Once you have loaded your families, the Family Browser is able to display your families in a tree structure. You can then simply click on the icons to place the families in the project.
Our goal with this add-on is to optimize family management and speed up the design process in Autodesk Revit.
- Target group
- Compatibility
- Setup
- Prerequisite for loading families
- Creating the images
- The Family Browser
- New feature in the Family Browser 2.0.0.0
Target group:
The application is aimed at people who regularly work with Revit families. In addition, the Family Browser is designed for users with different levels of experience, from beginners to experienced Revit users, and offers a user-friendly solution for the efficient integration of family libraries into the Revit user interface. Basic knowledge of using Revit is recommended.
Compatibility:
The Family Browser is compatible with the following Revit versions:
- Autodesk Revit 2020
- Autodesk Revit 2021
- Autodesk Revit 2022
- Autodesk Revit 2023
- Autodesk Revit 2024
- Autodesk Revit 2025
Setup:
The Family Browser is installed via the Revit AppStore. If it is not possible for you to use this, you can contact us directly to obtain the add-on.
Prerequisite for loading families:
To integrate a folder into the Family Browser, it must have one or more subfolders, in which the individual Revit families are then located. After the "start folder" has been loaded, the AddOn is able to display the Revit families in the individual subfolders in a tree structure. It is possible to create several subfolders.

Start folder
An icon (.jpg or .png file) representing the RFA file is required for the individual Revit families. This icon will later be displayed in the Revit user interface. The icon must be saved under the same name as the associated family so that the program can assign which icon belongs to which family.

Contents of the start folder
Creating the images:
The image should have a size of 32x32 pixels and 72 DPI. Deviating dimensions will result in a loss of quality or a smaller display. A different DPI setting can affect the size of the image. A line width of 1px is strongly recommended. More than 1px will result in a wider line, which may result in a blurred or fuzzy appearance as the line is not exactly on the individual pixel boundaries. No specific program is required.
When you load the Revit families into the Family Browser later, it will be represented on the Revit user interface as follows:
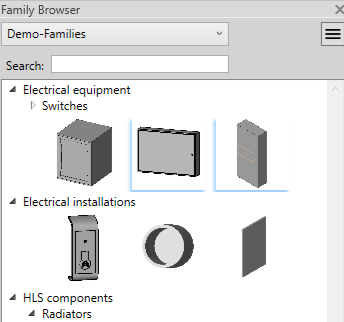
Row view for families
You can easily select an icon by clicking on it. The corresponding RFA file can then be placed in your project as often as you like.
It is possible to load several subfolders, which in turn contain several family files and icons. By clicking on the drop-down menu, all loaded family folders appear. You can quickly switch between the families by selecting a different family folder.
The Family Browser
After you have downloaded the Family Browser, a new tab called "Family Browser" appears on the Revit user interface.
As soon as you click on this, the following Revit ribbon appears:
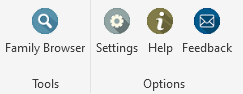
Tab: Family Browser
If you want to see your families, all you need to do is click on "Family Browser" in the "Tools" area. If you have any feedback, criticism or requests, you can send us an e-mail by clicking on the "Feedback" button in the "Options" area. To load and unload folders, click on "Settings" under "Options". The following dialog will then open:
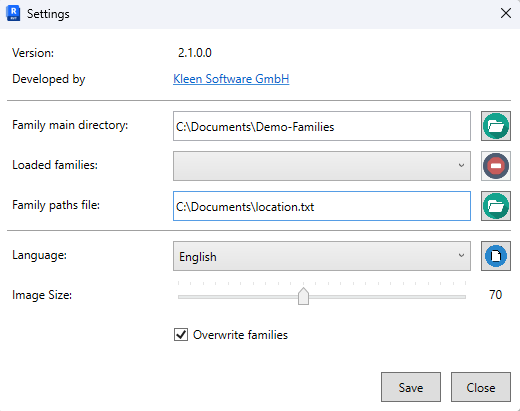
Settings dialog
To load a new family, click on the green Add button at the top. This will take you to your directory. You can now select the desired folder. After successful loading, you will see the folder name under "Family main directory:". By loading several family folders, you can later switch between the folders when selecting the icons using the drop-down menu. To remove a loaded family, select the corresponding family folder in the drop-down menu and click on the red Remove button.
If a family has more than one type, it will be highlighted in blue in the bottom left-hand corner. In addition, a dialog will appear before the placement, which allows you to choose between the types:
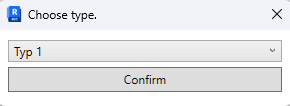
Selection of the family type
You can switch between the types using the drop-down menu. After clicking on "Confirm", you can place the selected family with the selected types in your project.
Extended features in the Family Browser - Premium Version
The Family Browser has a premium version for 5$ per month, which provides a variety of extra features to facilitate the use of families in Revit.
View with many new features:
- New display format for icons
- Display families without icons
- Marking of families with several types
- Search function
- Folder hierarchy
The extended settings dialog:
- Saving the main family directories
- Multilingualism
- Image size
- Overwriting families
Family view with many new features
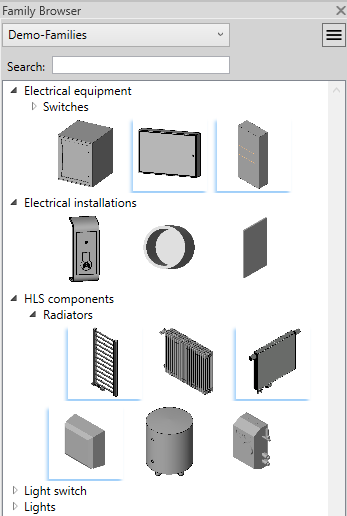
Row view
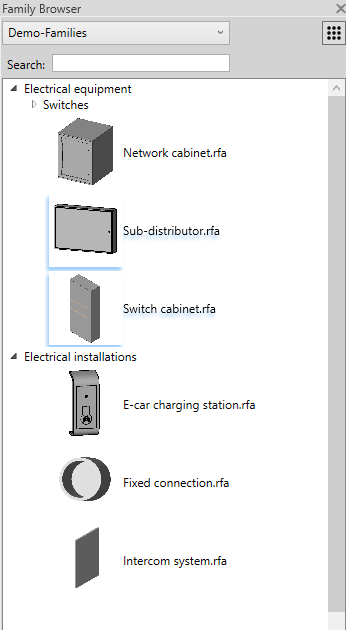
List view
New display format for families:
With the new version of the Family Browser, it is now possible for users to use a new display format for the icons. It is now possible to switch between two views. The new view can display the icons as a list and also show the names of the families. This display improves clarity and makes it quicker to use the families. You can switch between the views using a button at the top right.
Family without icon:
Another new feature is that adding an icon is no longer mandatory when using the list view. You can now only have the RFA file in the family folder. The Family Browser then only shows the name of the family in the view.
Please note: This only applies to the list view, as the names are not displayed in the row view.
Marking of families with several types:
In the view, families that have several family types are marked with a small blue corner. This visual marker allows the user to see at a glance whether a family has different types to choose from. This makes it possible to quickly determine whether alternative types exist before using a family, without having to open or check the family beforehand.
This function makes work easier, especially for complex projects, as it provides a better overview of the available family types and enables a more efficient selection.
Search function:
Another time-saving function for finding loaded families is the search function. This allows users to quickly and efficiently search for specific families and folders in the library and easily integrate them into their Revit project.
Folder hierarchy:
For even better structuring, all families are recognized recursively in all folders of the specified main directory. This means, as can be seen in the program excerpt above, that it is now not only possible to place families and icons directly in subfolders, but also to create additional folders, which in turn can contain additional families and icons.
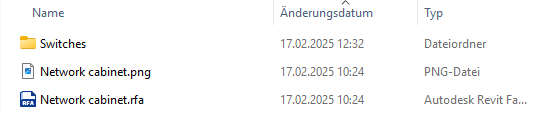
Example of the contents of a family folder
The extended settings dialog
Settings dialog
Saving the main family directories:
In the "File with family paths:" area, the latest function offers the option of loading a TXT file from your directories into the program. The TXT file is then used as the storage location for the loaded families. You have the option of loading different TXT files, each containing different loaded families. This flexibility allows you to select the appropriate TXT file containing the desired main family directories as required. If you do not use a TXT file, the program saves the main family directories in an internal file.
Multilingualism:
In the "Language:" area, you will see a drop-down menu that lists all currently available languages. Click on the button to the right to open a language file, which allows you to add more languages to the program. When adding a new language, please note that each column represents a specific language. Enter the name of the respective language in the first line. Below this, add the translations, whereby the first two columns are already adapted for English and German. Make sure that a line always contains the same word, but in a different language. The order of the words must not be changed. After adding a new language, you must save and close the language file. You can then see and select the new language in the drop-down menu. A language change is accepted by the program when you click on "Save".
Image size:
Under the "Language:" area is the "Image size:" area. This refers to the size of the family icons in the view. You can adjust the icon size by moving the slider. Please note that the change will only take effect for the program when you click on "Save".
Overwriting families:
Do you often make changes to your families? Then you can now activate the overwriting of families in the settings dialog. After selecting an overwritten family, all family instances of this family that have already been used in your project will be updated.
As long as overwrite is activated, the system checks whether there are any changes each time families are set.